TL;DR
This article walks you through a Python-based, agentic AI portfolio manager that runs continuously during market hours. It combines qualitative news sentiment with quantitative signals, allocates portfolio weights using an LLM, and executes trades using the Alpaca API. You get the full code and a clear guide to run it and create your own bot.
What you will get:
- A working multi-agent trading workflow built with LangGraph.
- An end-to-end example that combines news sentiment with a machine-learning signal.
- A practical template for continuous portfolio rebalancing using the Alpaca API.
- A “how-to” file where you’ll get the useful prompts to create your own bot.
The Problem with Manual Portfolio Management
Managing a portfolio by hand is time-consuming and inconsistent. You need to track news, analyze price data, and make allocation decisions while maintaining timely, disciplined execution. This is hard to do repeatedly and objectively during market hours.
An agentic workflow addresses this by breaking the process into specialized steps: analyze, allocate, execute, and report. The result is a repeatable, inspectable process that can run continuously with clear logic for each decision stage.
Introducing the Agentic AI Portfolio Manager
This project implements a multi-agent workflow that continuously manages a portfolio. It uses LangGraph and an ML model to orchestrate specialists who each handle one part of the trading loop:
- An Analyst agent for news and price analysis.
- A Portfolio agent for capital allocation.
- An Execution agent for trading via Alpaca.
- An Email Notifier agent for reporting.
The system runs in a loop during market hours and can execute at intraday intervals (e.g., every 5 minutes) or daily.
Each trading period, the bot’s multi-agent system works as follows:
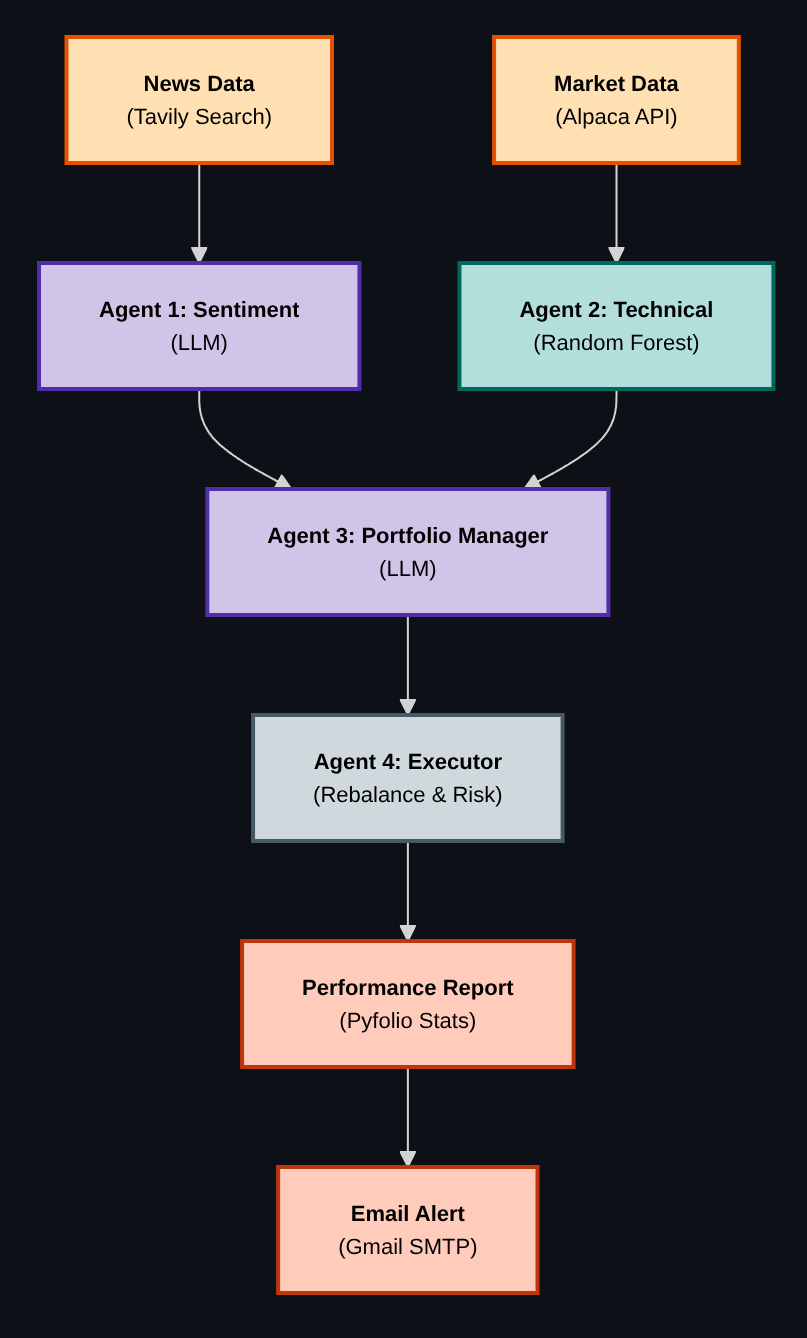
How It Works: A High-Level View
The architecture is straightforward:
- You define a list of tickers and a data frequency.
- The Analyst agent pulls historical data and recent news.
- Two signals are created: qualitative sentiment (LLM + news) and quantitative prediction (Random Forest on technical indicators).
- If both signals agree, the stock receives a BUY signal.
- The Portfolio agent uses the LLM to allocate weights across BUY candidates.
- The Execution agent rebalances the portfolio via the Alpaca API.
- The Email Notifier agent generates a report and sends a summary.
In the following terminal output excerpts, we ran the bot for a trading period. First, we show some information of the trading day:
Then, we search news with the corresponding agent:
Finally, we provide the signal and rebalance if necessary:
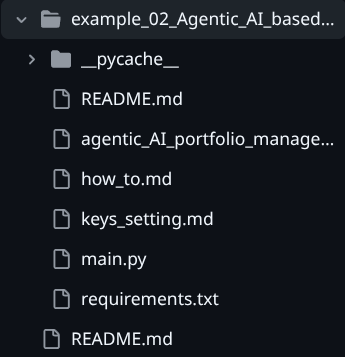
The Core Workflow Files
This example is designed to be easy to follow and modify. The key files are:
- agentic_AI_portfolio_manager.py: The main workflow, agent nodes, and tools.
- main.py: The entry point that launches the continuous engine loop.
- how_to.md: A step-by-step, prompt-driven guide to building the system.
- README.md: Quickstart instructions to run the bot.
- keys_setting.md: Instructions for setting API keys.
You can find below the folder structure in the GitHub repository:
Inside the Analyst Agent
The analyst performs both qualitative and quantitative analysis for each ticker:
- Qualitative: Uses Tavily Search to gather recent news and an LLM (Gemini) to classify sentiment as BUY or HOLD.
- Quantitative: Trains a Random Forest model on historical data with technical indicators (e.g., SMA, RSI) to predict next-day direction.
- Final signal: BUY only if both qualitative and quantitative signals agree.
Inside the Portfolio Agent
The portfolio agent receives BUY signals and allocates capital accordingly. It prompts the LLM to return a JSON object of weights that sum to 1.0. If the JSON is invalid, it falls back to an equal-weight allocation.
This keeps allocation decisions transparent and repeatable while allowing the LLM to integrate the news context.
Image suggestion: Screenshot of the portfolio allocation prompt and JSON response.
Inside the Execution Agent
The execution agent connects to Alpaca and rebalances the account. It closes existing positions and places new market orders using notional sizing. Optional risk management parameters support stop-loss and take-profit orders.
This makes the execution logic explicit and easy to extend for different order types or risk controls.
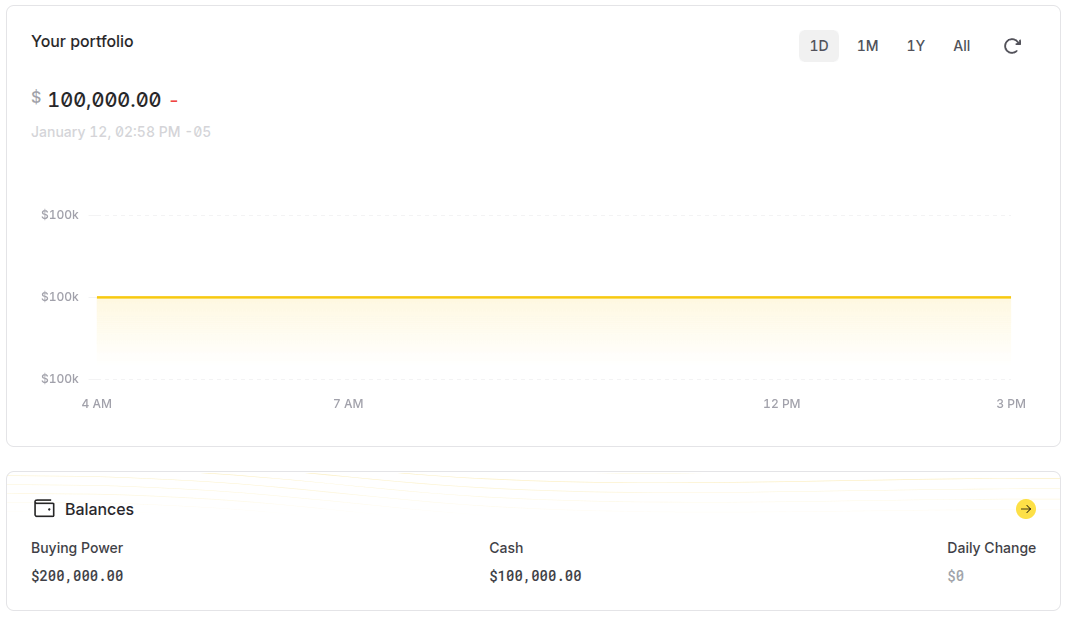
You can check your equity curve performance on the same Alpaca webpage:
Getting Started: The “How-To” Guide
The how_to.md file walks through the entire build in a conversational, prompt-driven style. It shows how to:
- Define tools for data, news search, and email reporting.
- Build specialist nodes and assign each with clear responsibilities.
- Assemble the nodes into a LangGraph workflow.
- Create a continuous engine loop that runs only during market hours.
Find below an excerpt of the how-to file content:
Prompting for the Analyst Node:
"Please write a Python function called
analysis_nodethat takes a
list of stock tickers. For each ticker, it should:
- Use the
fetch_historical_datatool to get market data.- Use the
web_search_for_newstool to get recent news.- Perform a qualitative analysis: Use the Gemini LLM to
read the news and decide if the sentiment is a "BUY" (1) or "HOLD"
(0).- Perform a quantitative analysis: Use
scikit-learnto
train aRandomForestClassifieron the historical data (using SMAs
and RSI as features) to predict if the next day's price will go up (1)
or down (0).- Combine the signals: The final signal should be "BUY"
(1) only if both the qualitative and quantitative analyses agree.- It should return the signals and news for all tickers."
Using the Example: The “README” File
If you want to run the system immediately, the README.md provides a step-by-step guide:
- Install dependencies.
- Create the .env file with API keys and email credentials.
- Configure tickers, data frequency, and risk parameters.
- Run main.py to start the continuous agent loop.
Find below an excerpt of the README file:
Step 4: Configure API Keys and Environment Variables
You need to create a file named .env in your project directory (the same location as agentic_AI_portfolio_manager.py) and add all required API keys and credentials listed below.
** For Mac/Linux Users**
- Open your terminal and navigate to the project directory.
- Use the
touchcommand to create the file:touch .env - Use a text editor like
nanoorvi(or your preferred editor) to open and edit the file:nano .env - Copy and paste the contents below into the
.envfile, replacing the placeholder values with your actual keys and credentials:
Why This is Better
This workflow is modular, inspectable, and adaptable:
- It’s transparent: each decision step is visible and editable.
- It’s extensible: add new data sources or new agents without rewriting the system.
- It’s practical: it runs continuously and automates analysis, allocation, and execution.
- It’s a learning tool: you can study each component in isolation.
Find below the workflow set in the Python script:
Next Steps
There are many ways to extend this project:
- Swap the Random Forest for another model (e.g., Gradient Boosting, SVM).
- Add fundamental or macro data sources to the analysis node.
- Enhance allocation logic (e.g., risk parity or mean-variance optimization).
- Add portfolio constraints or position limits.
Conclusion
This agentic AI portfolio manager is a practical blueprint for automated portfolio workflows. It combines LLM reasoning with quantitative signals and real trade execution in a clear, modular architecture that you can study and extend.
Ready to explore it? Run the example, inspect the nodes, and adapt the workflow to your trading ideas.
This trading bot is hosted in our GitHub repository : AI in Trading Workflow. Have a look at the entire repository to find additional examples on the same topic.
Connect with an EPAT career counsellor to discuss the right quant role for your background.
Disclaimer: This project is for educational and illustrative purposes only. Trading in financial markets involves substantial risk of loss. The code and concepts discussed here are not financial advice. Always exercise caution and thoroughly understand any automated trading system before deploying it in a live environment.